

How To Repair Hampton Bay Ceiling Fan Pull Chain
How to Install Ceiling Fans
Information technology'southward easier than you call back, even on an angled ceiling.
![]() Time
Time
A full 24-hour interval
![]() Complexity
Complexity
Intermediate
![]() Cost
Cost
$101–250
Introduction
A ceiling fan improves cooling in summer and heating in winter. The result: You feel more comfy while you save on utility bills. And installing them yourself is much easier, thanks to new, potent hanging systems and electronic controls. We evidence you how to avert common pitfalls when installing one yourself.
Tools Required
Materials Required
- Ceiling fan
- Fan caryatid and box assembly
- Switch
- Wire connectors
Project step-past-pace (13)
Footstep 1
Overview and getting started
Mensurate the ceiling slope
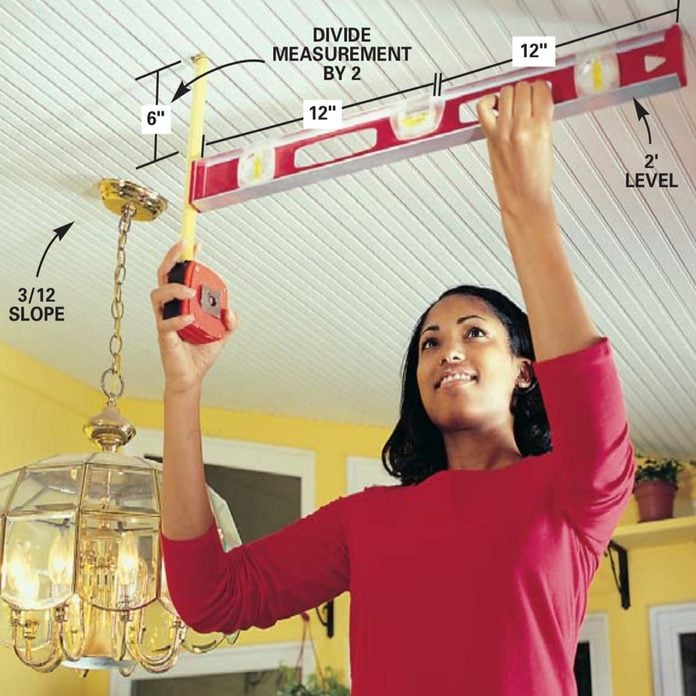
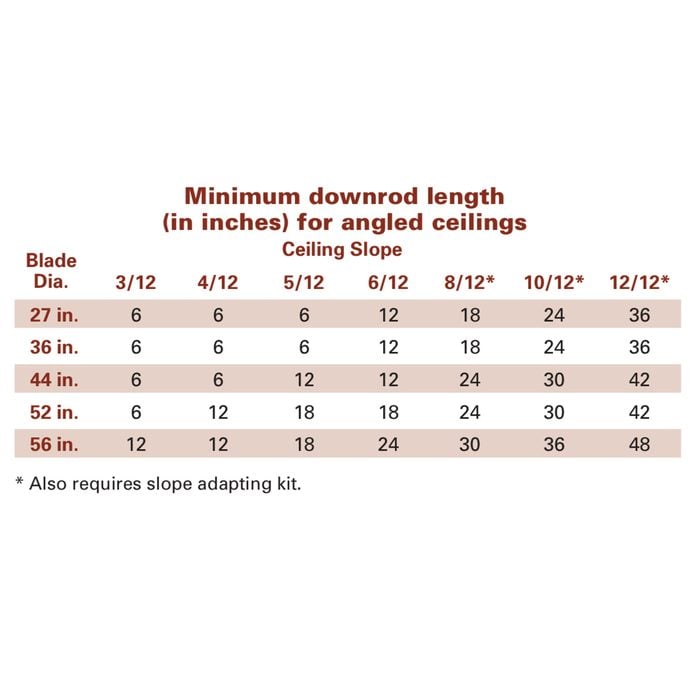
Determine the ceiling slope by holding a 2-ft. level against the ceiling and measuring the vertical distance from the level to the ceiling. Divide that number by 2 to get the driblet over 12 in. of horizontal run, 3/12 slope in our example. Run across the chart below to decide the minimum downrod length for the blade diameter y'all'd like.
Yous don't have to be a "Casablanca" aficionado to appreciate the elegance a ceiling fan can bring to your home. And y'all tin can enjoy a fan all year long as it creates a welcome breeze in the summer and circulates warm air in the wintertime.
Installing a ceiling fan (technically called "paddle fans") used to exist frustrating, to say the least. Most of the time you lot had to fly it because specialty hanging systems were poorly adult or nonexistent. Nowadays, most manufacturers have designed versatile fan mounting systems that take the hassle out of installing a ceiling fan. When you add together in the improved, stronger ceiling boxes, you'll detect that just about whatever ceiling fan can go upwards quick and easy on whatsoever ceiling, sloped or flat.
In this article, nosotros'll illustrate crystal-clear instructions that become across the bones prepare included with the fan. We'll besides prove you lot how to avoid common pitfalls like putting on parts in the wrong social club and forgetting to skid shrouds on ahead of time. Some mistakes are more serious than these. Standard electric boxes or blades hung too low can exist downright unsafe.
In addition to the fan, you can buy accessories similar electronic controls, fancy calorie-free packages and furniture-course paddles.
Put upwards a new fan in a leisurely Saturday afternoon
If everything goes well, yous can put upwards a ceiling fan in a couple of hours, including cleanup. In well-nigh cases, the whole job will take only a hammer, a screwdriver, a 3/8-in. nut driver and a wire stripper.
Most of the time, the wires that fed a previous ceiling fan wiring light fixture are adequate for hooking up a new fan. If you have a ceiling fan wiring organisation that's dissimilar from ours and y'all are unfamiliar with wiring techniques, consult an electrician or edifice inspector for help.
Follow the photo serial for basic installation steps that utilize to more than 95 per centum of all fans. There may be small variations, particularly when it comes to the light and blade mountings, then you'll all the same demand to consult the instructions provided with your fan. Equally with whatsoever other electrical work, you may demand an electrical let from your local building section before starting the job. The inspector will tell you when to telephone call for an inspection.
Fan Peak Requirements
Manufacturers more often than not require that fan blades exist at least vii ft. above the flooring. Since most fan and motor assemblies are less than 12 in. high, they'll fit under a standard 8-ft. ceiling with the proper clearance.
Angled ceilings crave that you install "downrods" (likewise called extension tubes or downtubes) that will lower the motor and fan blades and so they'll articulate a sloped ceiling surface. The more than space between the ceiling and the fan, the improve. The fan will have more than air to draw from, and you'll feel more air motility because the blades are closer to you.
Almost fans come with a short downrod designed for mounting on 8-ft. ceilings. If your ceiling's less than eight ft., you'll need to remove the rod provided and flush-mount the fan. But if y'all accept a higher or sloped ceiling, purchase a longer downrod.
Pace two
Knock out the old box and install a fan caryatid

Shut off the power at the primary panel and remove the lite fixture. Knock the existing electrical box gratis of the framing with a hammer and a block of wood, so pull the electrical cable gratuitous of the former box and through the ceiling hole. Leave the old ceiling fan junction box in the ceiling crenel unless you can easily remove information technology through the pigsty.
Tip: Before you blast out the box, bend back the plastic clamps or loosen the metal cable clamps so it'll be easier to pull the electrical cable gratis after the box is loosened.
![]()
Pace 3
Install the ceiling brace
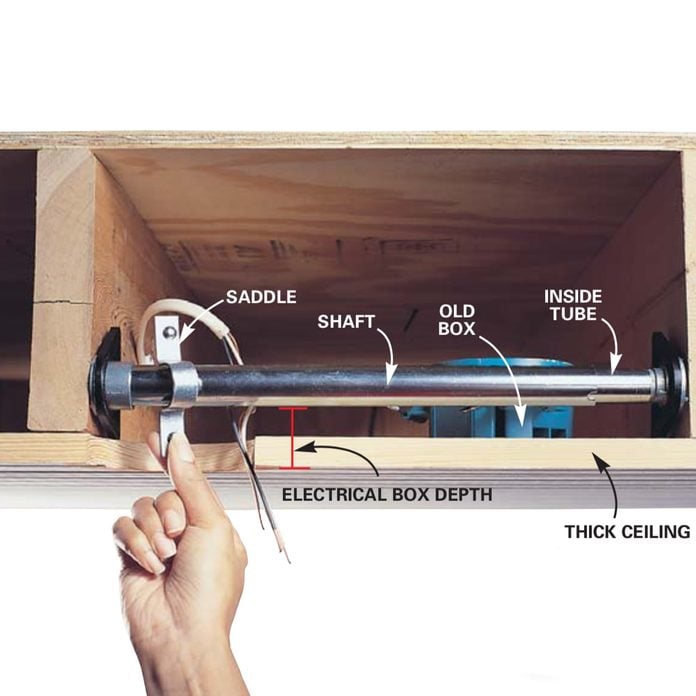
Feed the fan brace upwardly into the hole, remainder the flat edge of the feet against the ceiling and center the shaft over the pigsty. If your ceiling is more than than ane/2 in. thick, equally ours was, rotate the feet and position the rod the depth of the box from the ceiling. Rotate the shaft to secure the brace to the framing. Snap the metal saddle over the shaft so it's centered over the hole.
Shut-upward of fan brace
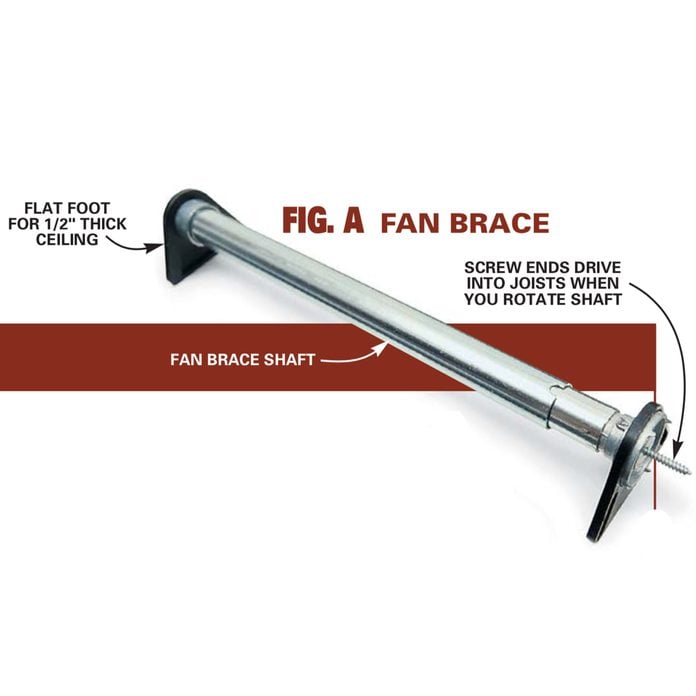
The brace ends fit confronting the ceiling and the finish screws drive into the joints equally you rotate the shaft.
Before starting whatever piece of work, shut off the circuit breaker that feeds the switch and light fixture. If there'south a working bulb in the fixture, turn it on. Then you'll know y'all take the right breaker when the bulb goes out. Check the wires with a voltage tester to brand certain they're off after removing the fixture and when changing the wall switch.
The side by side step is to remove the existing plastic or metal electrical box and install a "fan brace" that's designed to concord ceiling fans. Few conventional boxes are strong enough to support a ceiling fan, so don't even recall nigh trying to hang your fan from an existing box. Instead, buy a fan brace when you buy your fan. You tin can choose braces that fasten with screws if the framing is accessible from the cranium or if information technology's new construction. Otherwise, choice a brace that'due south designed to slip through the ceiling hole and through the electrical box. These braces (Photos 3 and closeup) adjust to fit between the framing members in your ceiling; you simply rotate the shaft to anchor them to the framing.
Most existing electrical boxes are attached to the framing with nails, making them easy to pound out with a hammer and a block of woods (Photo 2). Afterwards you free the cable, merely leave the former box in the cavity (Photograph iii) rather than struggling to work the box through the ceiling hole. And so pull the cable through the pigsty and slip the fan caryatid through the opening and secure it, following the directions that came with the caryatid. Little feet on the ends of braces go along them the right distance from the backside of 1/two-in. thick ceilings so the new electrical box will exist flush with the surface. If you have a thicker ceiling (like ours), rotate the ends to accomplish the right spacing.
Step 4
Install a new ceiling fan mounting box: electric box and a ceiling fan wiring hanger bracket
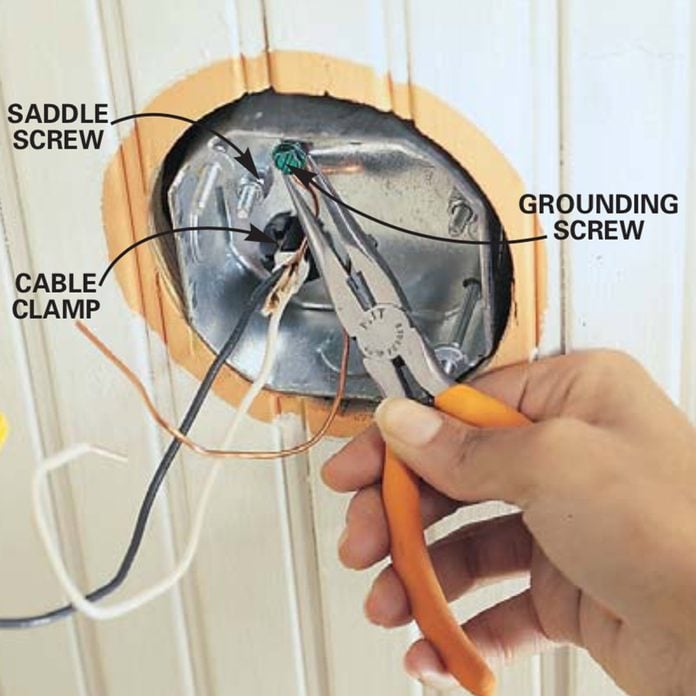
Feed the existing wire through the cable clench in the tiptop of the new metal ceiling fan junction box, slip the box over the saddle screws, and tighten the nuts to clench the box to the shaft with a nut driver or a deep-well socket. Crimp a loop of grounding wire three-quarters effectually the grounding spiral and tighten the screw.
Step v
Attach the hanger subclass

Position the hanger bracket so that the opening in the bracket is on the uphill side of the sloped ceiling. Then screw it into the box with the special screws provided with the fan brace.
Pull the ceiling fan wiring into the new box, mountain the box onto the brace (Photo 4) and attach the fan hanger bracket (Photograph 5).
Step 6
Assemble the fan and hang it
Insert the right size downrod
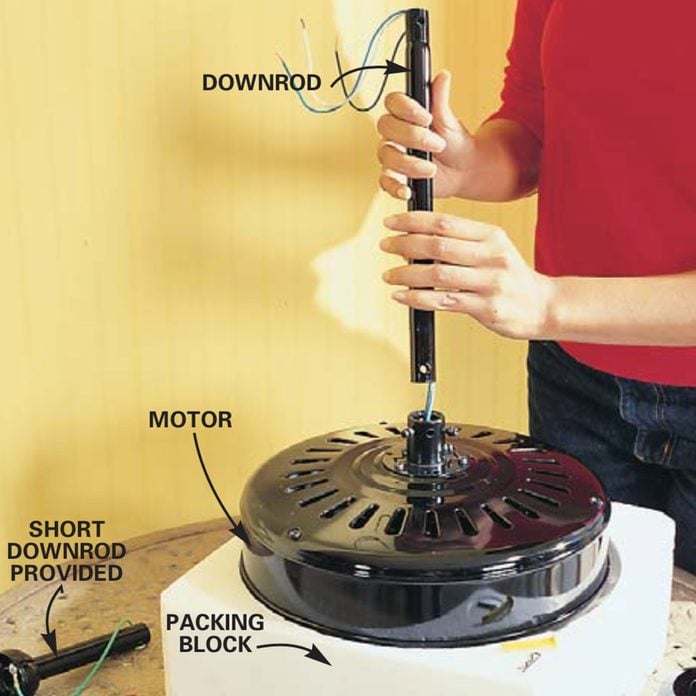
Place the motor right side up, thread the wire through the downrod and insert the downrod into the mounting collar.
Stride vii
Fasten the downrod deeply
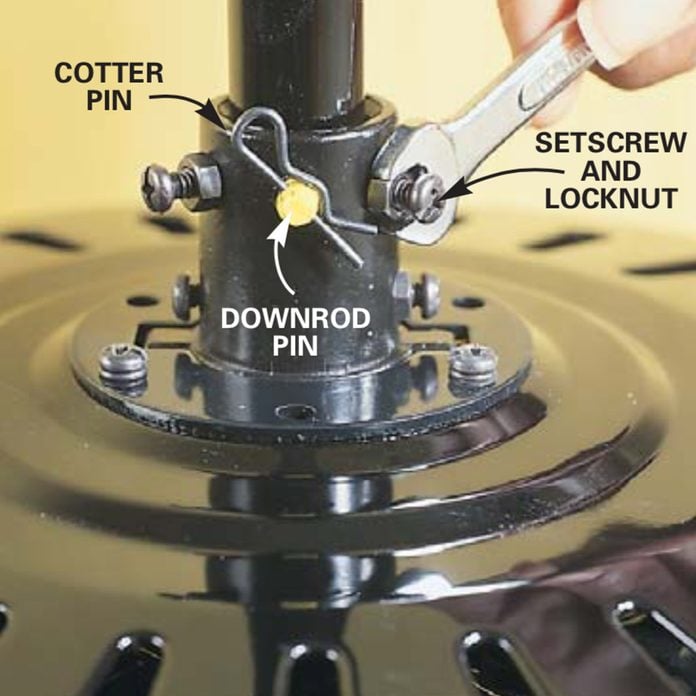
Slip the downrod pin through the collar and tube, lock it into identify with the cotter pin, and tighten the screws and locknuts.
Tip: Tighten the locknuts firmly. Loose nuts are the virtually common cause of wobbly fans.
Stride 8
Prepare the hanging brawl
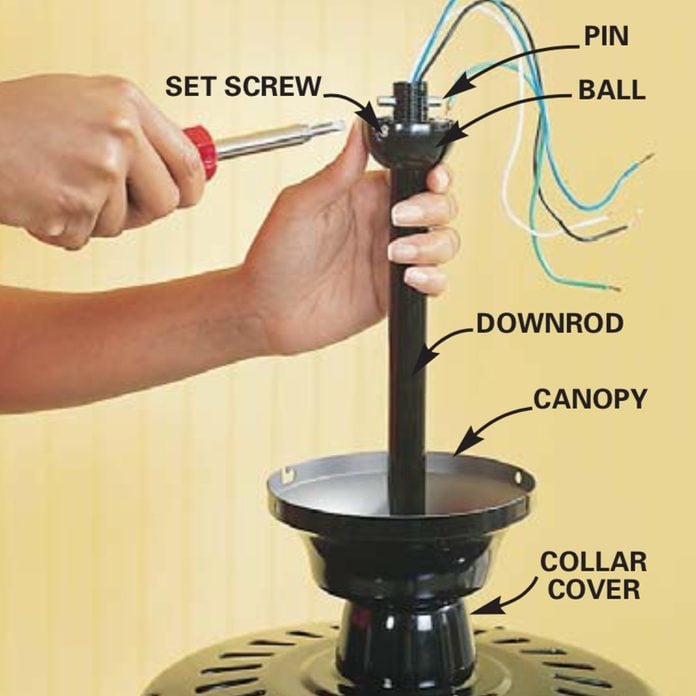
Slip the collar cover, then the awning over the downrod. Slide the brawl over the downrod and push button the pivot through both sets of holes, then lift the brawl over the pivot and tighten the set spiral.
Footstep nine
Hang the motor

Lift the assembly over the open side of the bracket and lower it into place. Rotate the motor until the ball slot locks into place over the tab on the bracket. Your fan will include assembly instructions. Photos vi – nine volition help you with several fundamental steps.
Step 10
Wire the fan, fan low-cal and switch
Connect ceiling fan wiring at the fan: Know your ceiling fan wire colors

This is what you need to know well-nigh ceiling fan wire colors: Connect the blank footing wire from the box to the dark-green basis wire on the bracket with a wire connector. Connect the white neutral wire from the motor to the neutral wire from the box. Connect the blue and blackness wire from the motor to the blackness hot wire from the box and neatly fold them into the box.
Stride eleven
Attach the fan blades
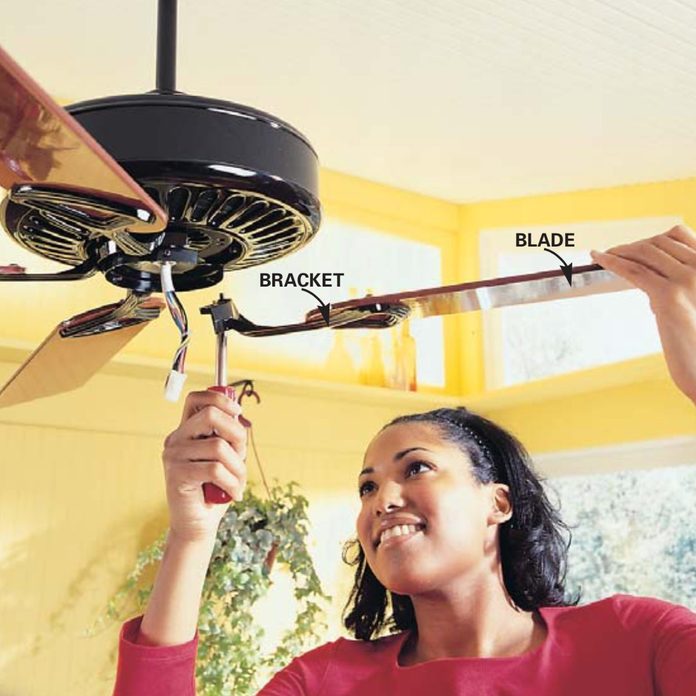
Spiral the fan blades to their brackets and screw the brackets to the bottom of the motor. It's easiest to hold the spiral in the subclass with the screwdriver while yous lift the bract assembly into position. So drive the screw in.
Step 12
Connect the light pod and radio receiver
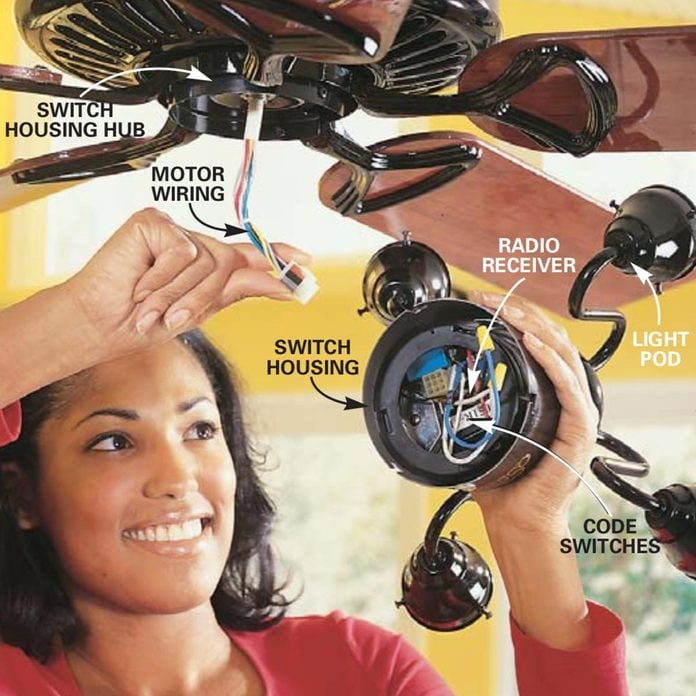
Place the radio receiver into the switch housing/light pod associates and connect the light pod wires according to the manufacturer's instructions. Note the settings on the receiver's code toggles so you can dial in the same settings on the electronic controls at the wall switch. Now loosen the screws in the switch-housing hub halfway. Plug the motor ceiling fan wiring into the receptacle on the receiver and twist the switch housing into place on the hub. Retighten the screws.
Step xiii
Connect the switch
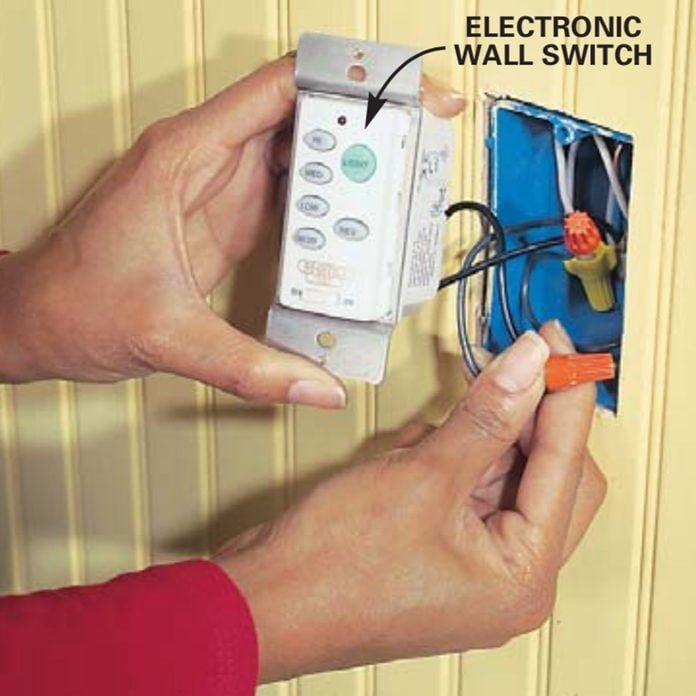
Check and reset (if necessary) the code toggles on the wall-mounted electronic switch to lucifer the ones on the receiver. Remove the existing wall switch and connect the 2 black wires on the new switch to the ones that were connected to the erstwhile switch with wire connectors. Screw the switch into the box and install the cover plate.
New electronic controls salve y'all from running additional ceiling fan wiring.
Since near fan installations are retrofits into existing electrical boxes, there's normally a single electrical cable connecting the fixture to a unmarried wall switch. Y'all tin can go out the switch and employ information technology to turn the fan on and off, so utilise the pull chains on the fan to control fan speed and lights. A second choice is to install electronic controls. Higher-quality fans give you the choice of adding a radio receiver kit. The receiver accepts signals from a special wall switch (included in the kit) to control the fan and light separately without additional wiring. The receiver also accepts signals from a handheld remote, so you lot can operate multiple fans and fine-tune fan speed and calorie-free intensity from your La-Z-Boy. Electronic switches are matched to fans past flipping code toggles in the controls and the fan, simply like with your garage door opener. Installing an electronic switch (Photo 12) is a snap. The receiver drops right into the fan housing and plugs into the bottom of the motor.
If the old light is fed past 2 three-way switches instead of a unmarried switch, the command options are a little more than complicated. You have iii choices:
- Get out the existing switches in identify and turn one of them on. Then utilise a remote control to command the fan and lights.
- Use the existing switches and control the fan and lights independently with pull chains.
- Disable ane of the three-way switches and rewire the other one to receive a wall-mounted electronic control. Sorting out all the wires is complex. You lot'll demand an electrician'south help for this.
Buying a Ceiling Fan

If you oasis't walked nether a large fan display still, hold onto your lid. You'll exist overwhelmed past the selection of colors, styles and accessories, especially if you visit a ceiling fan store. If you intend to use your fan regularly, invest in a high quality model. You'll go a quieter, more than efficient, more durable unit of measurement. If yous spend across that amount, you're usually paying for low-cal packages, radio-actuated remote and wall controls, style, and design (fancier motor castings, inlays, blade adornments or glasswork). If you lot spend less, you're likely to get a less efficient, less durable, noisier unit of measurement with fewer color, bract and electronic choices.
Cull the blade diameter that all-time suits the room visually and brand sure the unit will fit under the ceiling without jeopardizing beehive hairdos.
Bigger rooms call for wider fan blade diameters.
The bigger fan will not just look better simply also movement more air.
Most ceiling fans are designed for heated, enclosed spaces. If you lot're putting a fan in a screen room, a gazebo or other clammy area, the building lawmaking requires you to use a "damp-rated" fan. These fans have corrosion-resistant stainless steel or plastic parts that tin can stand up to loftier humidity and condensation. If you live in a coastal area with corrosive sea air, or if you're putting a fan in a peculiarly moisture environment like a greenhouse or an enclosed pool expanse, you should choose a "wet-rated" fan.
Originally Published: February 18, 2022

Source: https://www.familyhandyman.com/project/how-to-install-ceiling-fans/
Posted by: websterreptionall.blogspot.com
0 Response to "How To Repair Hampton Bay Ceiling Fan Pull Chain"
Post a Comment